Important: Do not update firmware unless explicitly directed by QuSpin.
The following guide provides instructions and links for all software tools for updating the firmware of the QZFM electronics module. The firmware will be sent as a digital file with a .hex extension and will include the serial number of the target QZFM electronics unit in the file name.
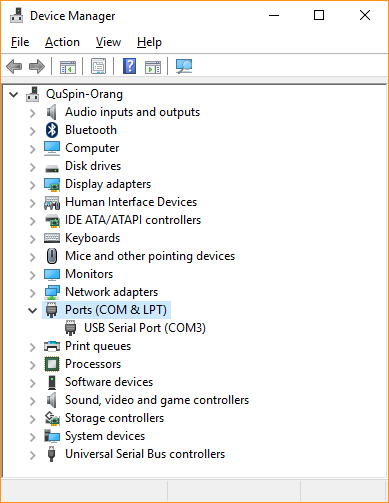
Figure 1: Windows Device manager showing the QZFM on USB serial port COM3.
For all QZFMs received after April 1, 2017, please follow the instructions in Method 1.
For all QZFMs with firmware that predates April 1, 2017, please follow the instruction in Method 2. Once the firmware is updated to the post April 1, 2017 version, these QZFM can also be updated directly through the USB using Method 1.
Current Gen2 Firmware Version: FSN:1_33
Method 1
The firmware for all QZFM electronics post April 1, 2017 can be updated directly through the USB port (without a programmer). Before updating the firmware, ensure the electronics unit is powered ON and is connected to the computer via the USB cable. Also, determine the assigned COM port number of the target QZFM. The COM port can be found in the Windows Device Manager under ‘Ports (COM & LPT)’, as shown in Figure 1. The QZFM USB port will be indicated as ‘USB Serial Port (COM3)’. Except for the target QZFM, it is highly recommended to disconnect the USB cables from all other QZFMs.
Steps: (Important: Do not proceed with firmware update unless explicitly directed by QuSpin)
- Download and run the QuSpin Firmware Loader software (Qfl1.1.0Installer.exe).
- In the installation window, select the path of the installation folder in the ‘Destination folder” field and click on ‘Extract’ to install. For example, ‘c:\QuSpin\QFL\”.
- Place the Firmware file received from QuSpin (.hex file) in the same folder as the QFL files.
-
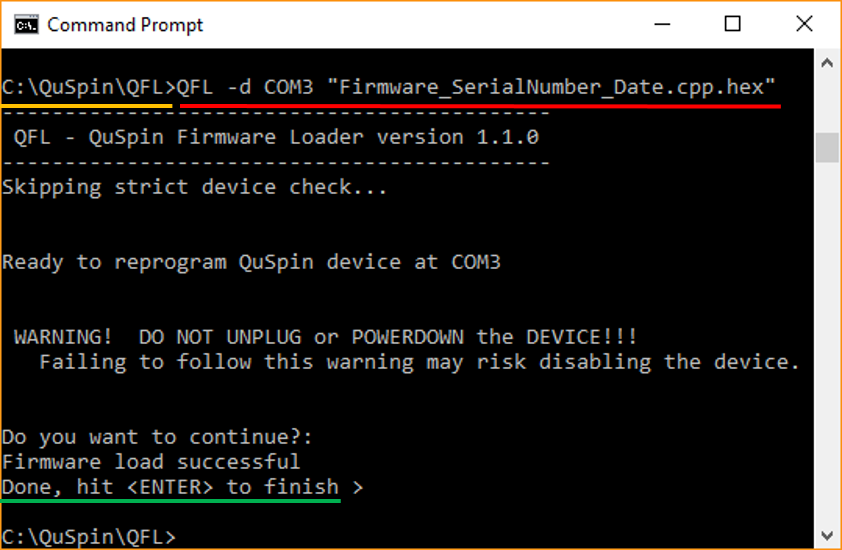
Figure 2: Command Prompt window
Open a Command Prompt window and go to the folder (directory) where the QFL are installed (Yellow underline in Figure 2).
- To update the firmware, at the prompt, type the command > QFL -d COMx “FirmwareFile.hex” (Red underline in Figure 2), where the ‘x’ after ‘COM’ is the com port number of the target QZFM electronics, and the name of the firmware file name (sent by QuSpin) is in the quotes (” ” are included, example shown in Figure 2).
- Press <Enter> and wait a few seconds. After the message “Do you want to continue?:” press <Enter> again and wait (Green circle in Figure 2). Note: Do not input any text during this step or the firmware update will not go through properly.
- After the message “Firmware load successful” and “Done, hit <ENTER> to finish >”, press <Enter> once more to complete the process.
- Finally, reboot (power cycle) the QZFM electronics and the firmware update is complete.
Method 2
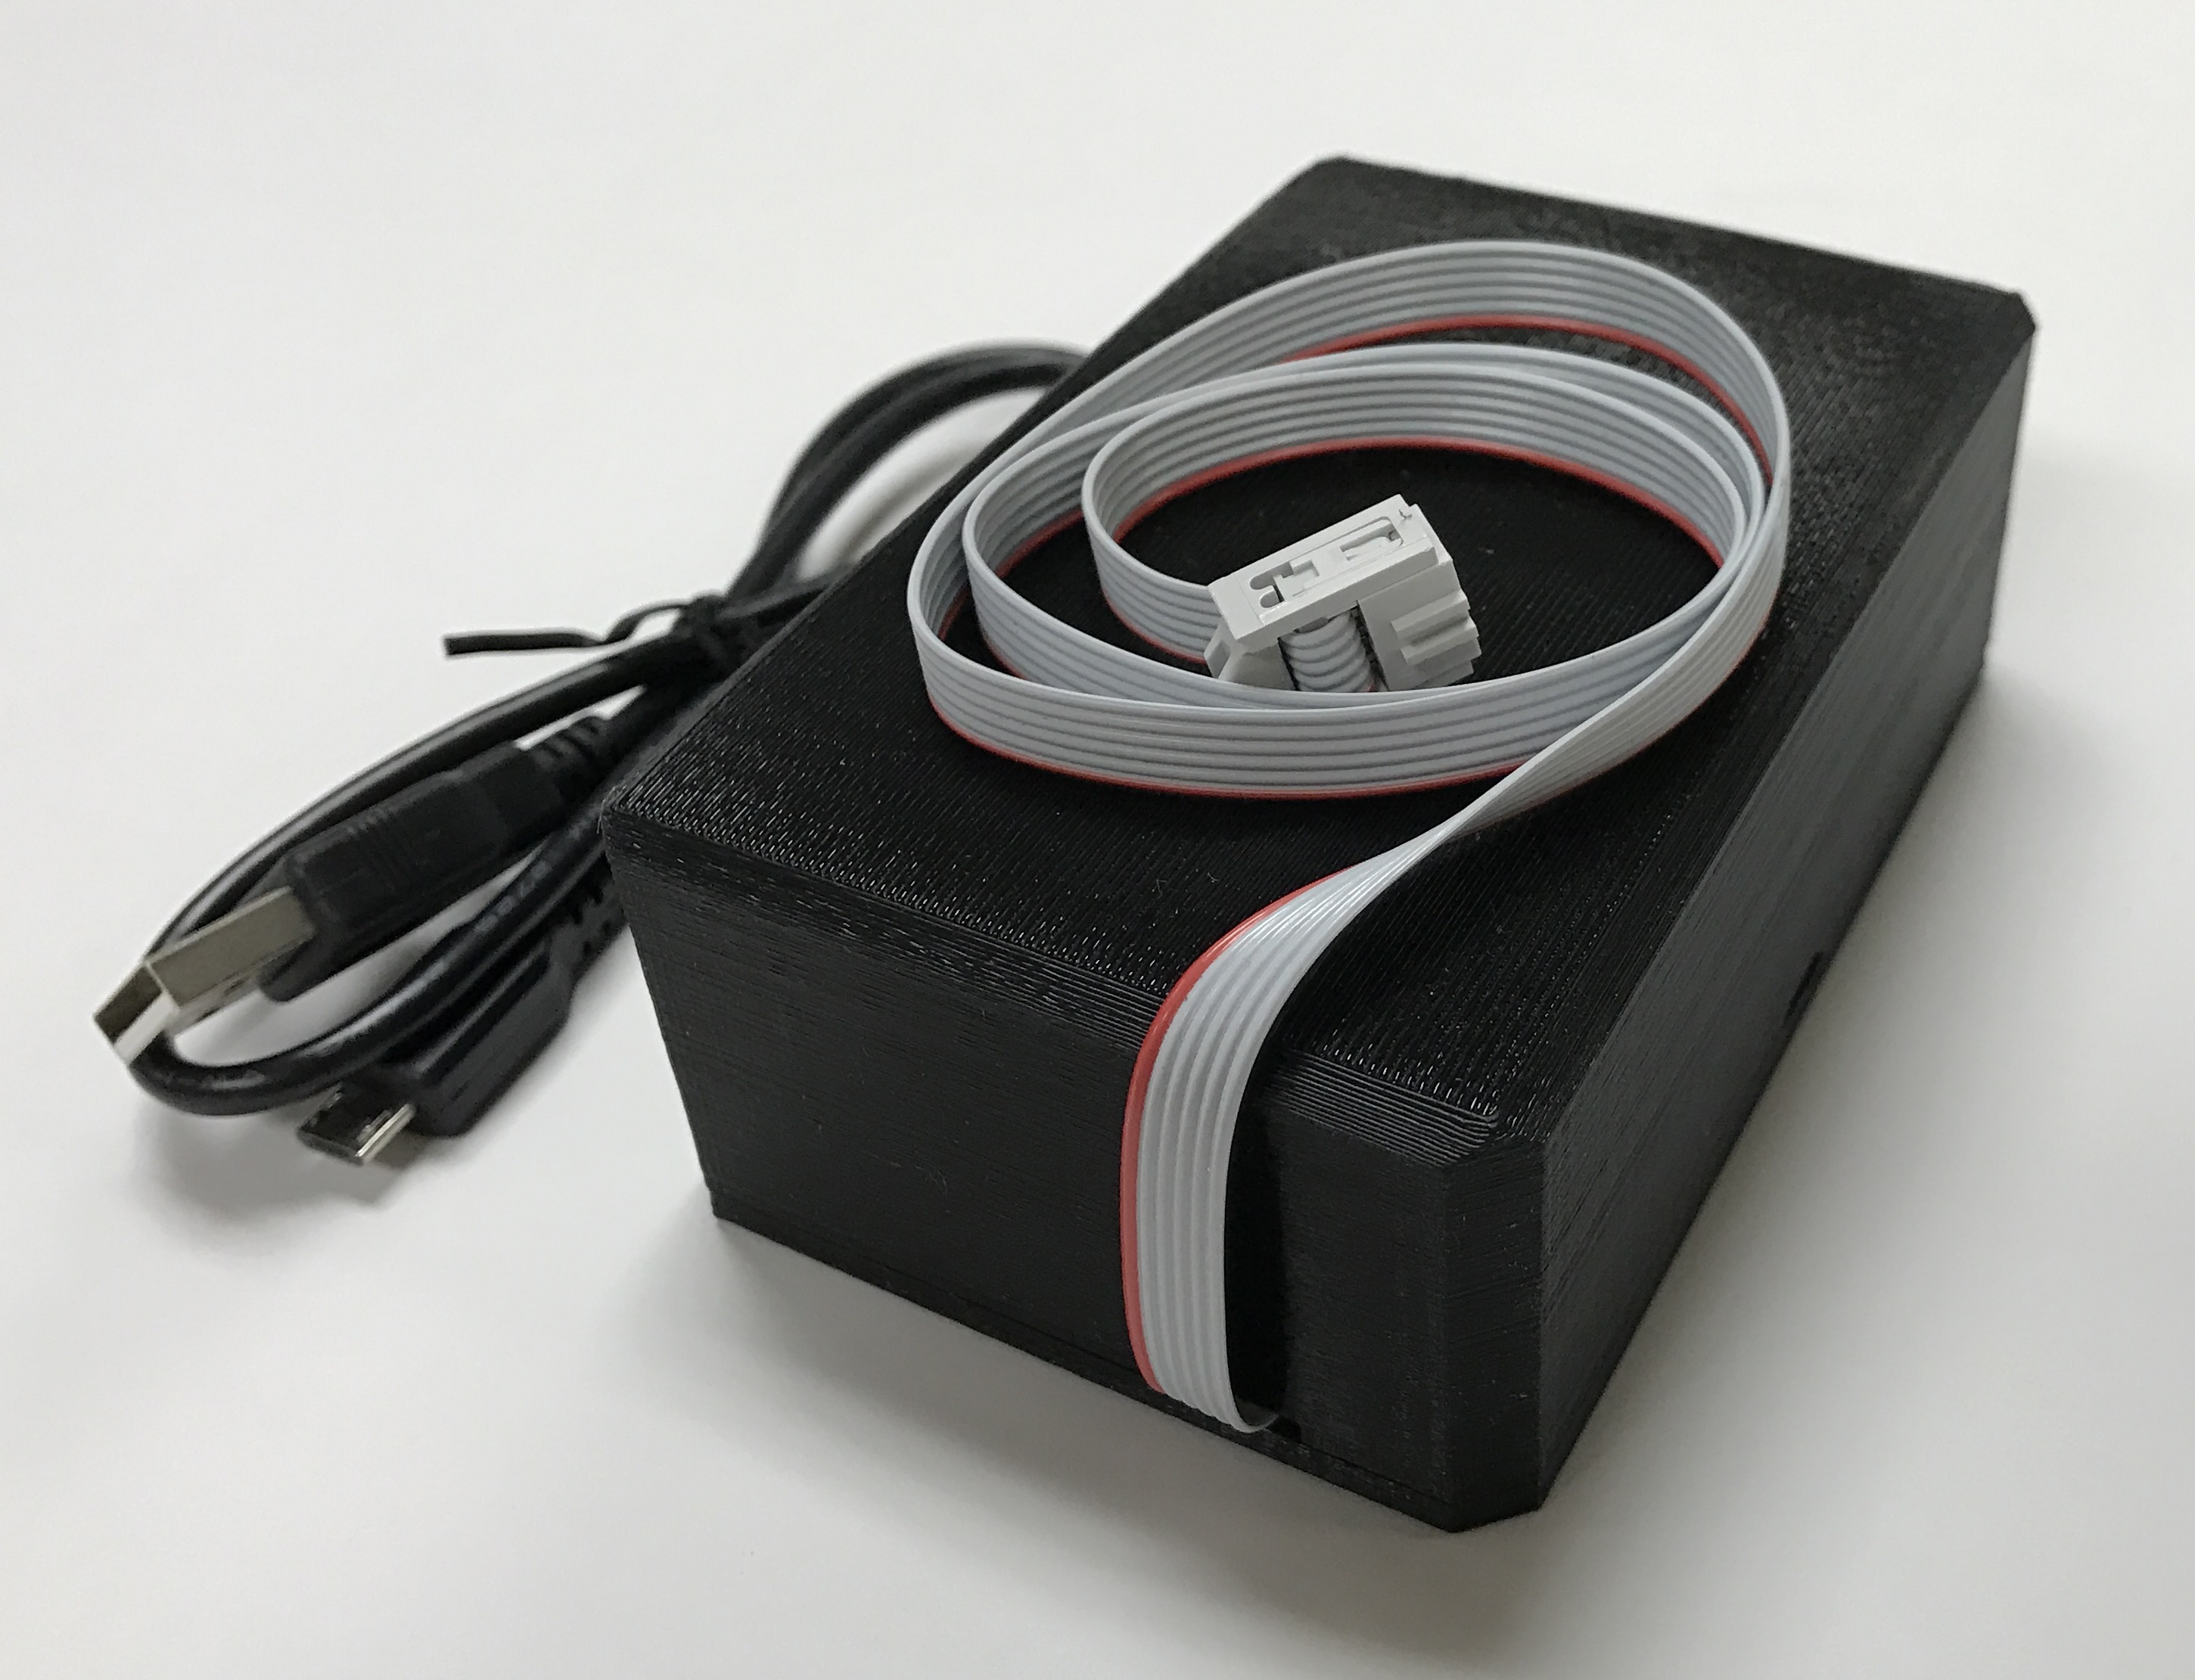
Figure 3: Programmer unit
This method is for all QZFMs with firmware version before April 1, 2017 and requires a programmer unit, as shown in Figure 3.
Steps:
- Download and unzip the file called “ezFET-Lite.zip”.
- Install either the “DPInst.exe” (32-bit) or “DPInst64.exe” (64-bit) depending on the computer.
- Connect the programmer to the the computer via the USB cable.
- Plug the ribbon cable connector from the programmer to the back side of the QZFM electronics module.
- Download and install the file called “FET-Pro430-Lite-Setup”. Follow default setting during installation.
- Run the application called “Lite FET-Pro430”.
- In the ‘Setup’ tab, select ‘Connection/Device Reset’ and check the ‘SPY Bi Wire’ option, then click ‘OK’.
- Use the open code file button (Yellow circle in Figure 2) to select the firmware file supplied by QuSpin (file ending with .hex).
-
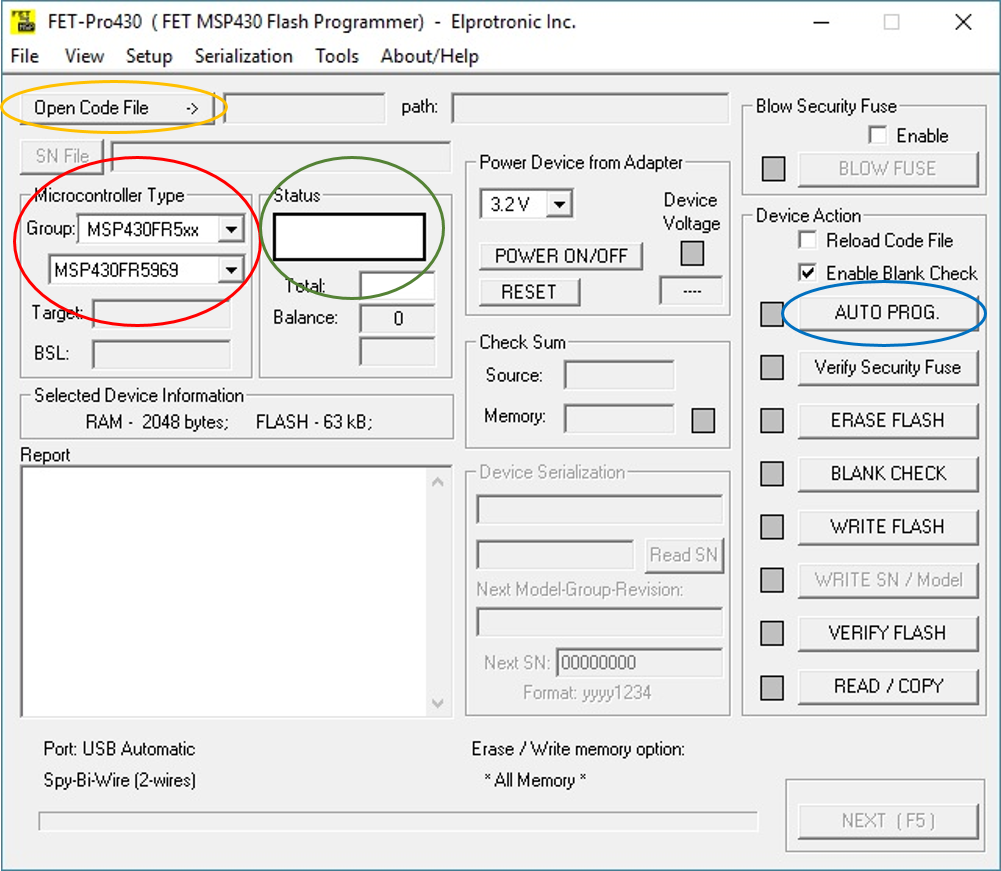
Figure 4: FET-Pro430 user interface
In the section labeled Microcontroller Type (Red circle in Figure 2), select ‘MSP430FR5xx’ in the ‘Group’ field and then select ‘MSP430FR5969’ in the field below.
- Click the ‘AUTO PROG’ button (Blue circle in Figure 2) to begin the reprogramming of the electronics module.
- When the Status field says ‘Pass’ (Green circle in Figure 2), the firmware upgrade process is complete.
- Unplug the programmer cable from the electronics box and power cycle the electronics module using the power switch.