
Magpie firmware vs. QTFM sensor firmware
This page covers Magpie / MiniACB logger firmware only — the ESP32 application that runs the data logger, Wi‑Fi, Bluetooth, SD card, and Ethernet. It does not update the QTFM Gen‑2 sensor that sits inside the Magpie. The sensor and the logger have separate firmware images and separate update paths.
To update the QTFM sensor firmware in a Magpie, connect a standard QuSpin Comms board to the flex-cable connector exposed on the side of the Magpie’s MiniACB board (highlighted below), then follow the QTFM Gen‑2 firmware update procedure on the QuSpin website. You will need to remove the outer Magpie shell to reach the connector, but the sensor itself stays mounted in the internal sled throughout — no need to disconnect or unmount it.
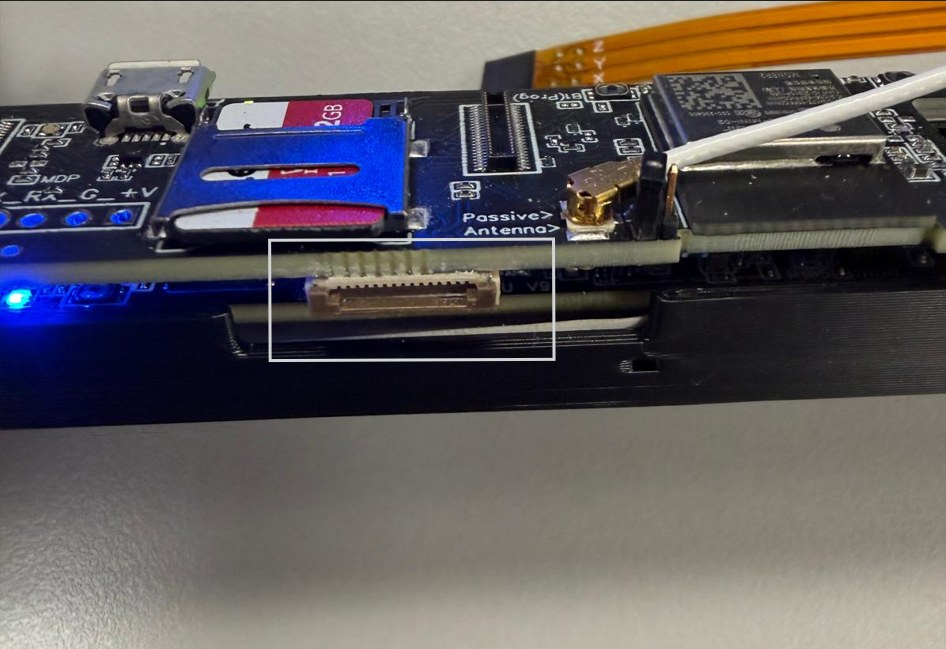
Sensor firmware update instructions: Gen‑2 QTFM Firmware Update Guide.
What’s new in V5.12
V5.12 is a stability release plus an upgrade to the ASPN GPS output format. It fixes a crash that can reboot units with a GPS receiver connected, so we recommend updating every Magpie running V5.9, V5.10, or V5.11 — especially units that fly or log with the GPS attached.
Crash on units with a GPS connected — fixed
Firmware versions V5.9 through V5.11 contain a fault that can crash and reboot the
Magpie when a GPS receiver is connected while the firmware writes settings to
internal flash memory — for example during Bluetooth startup, a configuration
save, or a serial-number refresh. In the worst case the unit enters a reboot loop
and never finishes starting up. On V5.11 the boot banner shows
#Reset reason: 4 (PANIC) after such a crash; on V5.9 and V5.10 the unit
simply restarts without explanation. A unit in this state can also appear connected
over Bluetooth while sending no data.
V5.12 fixes the fault. Builds containing the fix print
#GPIO ISR service installed at LEVEL3 (flash-safe) in the boot banner
— if your banner shows that line, you have the fix.
ASPN GPS output upgraded to GeodeticPosition3D
For Ethernet users publishing ASPN/LCM data: the GPS position message is now GeodeticPosition3D (ICD 1001.3) instead of Geodetic2D (1001.2), adding altitude to the GPS stream. Latitude and longitude are WGS‑84 in radians, altitude is meters above the WGS‑84 ellipsoid, and the message carries a 3×3 covariance about North, East, Down. The LCM channel name is unchanged.
The upgrade is automatic: on the first boot after updating, a standard-form GPS
device ID migrates from sdm://magpie/<serial>/1001.2/0 to
.../1001.3/0 on its own. Custom device IDs are left untouched.
Subscribers that still need the old 2D message can switch back at any time with
[gps_format 2d] ([gps_format 3d] returns to the new
default, and [gps_format] shows the current setting).
Units not using ASPN over Ethernet are unaffected by this change.
Bluetooth identity is now tied to the serial number
The Magpie’s Bluetooth address is now derived from its serial number instead
of the radio chip’s factory address. This fixes a long-standing Windows
pairing problem: previously, renaming a unit ([refresh_sn] after a
serial number change) confused the PC’s existing pairing record, which could
leave the unit paired but with no working COM port. From V5.12 on, a renamed Magpie
simply appears as a new Bluetooth device and pairs cleanly.
Because the Bluetooth address changes, any PC or device that was paired with your Magpie before V5.12 will see it as a new device. Remove the old entry in your Bluetooth settings, pair the Magpie again under the same name, and use the new Outgoing COM port that Windows creates. This happens once; later updates keep the same address.
Also included since V5.10
V5.11 (not previously posted here) disabled the ESP32 brownout detector during
startup and added a #Reset reason line to the boot banner (power-on,
brownout, external reset, watchdog, software reboot, or panic) — useful
diagnostic context when reporting an issue to QuSpin. Units coming from V5.8 or
V5.9 also get all of the V5.10 improvements: protection for older sensor firmware
(V1_41/V1_42) against UART command injection, empty-save-file warnings, automatic
serial-number handshake, and the post-reboot quiet period.
Follow Method 1 (Wi‑Fi OTA) below using
MINI_ACB_V5_12.ino.bin. No partition table changes since V5.8, so a
UART merged-bin flash is not required. Use Method 2 only if the OTA fails or if
QuSpin instructs otherwise.
Which method should I use?
Magpie supports two firmware update methods. Both end at the same place: the new firmware is running on your unit. They differ in how the file gets there and what cables you need.
Wi‑Fi OTA
Easiest. No extra software. Browser only.
- Use when the Magpie is already running and reachable on Wi‑Fi
- Uploads the smaller
.binfile via the Magpie web page - Triggered with the
[update]command
ESP32_Flasher.exe (UART)
Most reliable. Use for first-time setup, recovery, or major version jumps.
- Connects to the Magpie via USB cable
- Flashes the all-in-one merged binary at address
0x0 - Required when changing the partition table layout
Try Method 1 (Wi‑Fi OTA) first. It’s faster and works for almost all routine updates. Fall back to Method 2 if the OTA fails or if QuSpin specifies in the release notes that a UART flash is required.
Downloads
Click the file you need. Both binaries below are the same firmware version, just packaged differently for the two update methods.
For Method 1 (Wi‑Fi OTA)
For Method 2 (ESP32_Flasher.exe)
Don’t try to OTA the merged.bin or flash the small .bin via UART. The two formats are not interchangeable.
Method 1: Wi‑Fi OTA Update
The Magpie hosts a Wi‑Fi access point and a built-in web page. You upload the
.bin file through that page and then send a single command to apply it.
No extra software needed beyond a browser.
Before you start
- Magpie powered on, with the Wi‑Fi access point active (default after boot if Wi‑Fi mode is enabled)
-
The downloaded
MINI_ACB_V5_12.ino.binfile on the device you’ll use to do the upload (laptop, tablet, or phone) -
A way to send commands to the Magpie. Easiest options:
- The MiniACB browser page (this guide assumes that)
- Bluetooth via the QuSpin Windows app
- USB serial via PuTTY or any terminal
Steps
Connect to the Magpie’s Wi‑Fi access point.
On your laptop or phone, open Wi‑Fi settings and connect to the network
whose name matches the Magpie’s serial number (for example
T2M0-00NB Access Point). The default password is
12345678.
You may see “No internet” while connected to the Magpie. That’s expected.
Open the Magpie web page.
In a browser, navigate to:
http://miniacb/
If your network can’t resolve miniacb, use the fallback IP
from your shipping documents.
Scroll to the firmware upload section.
It’s at the bottom of the page, labeled “Upload a Firmware File.”
Click “Choose File” and select the downloaded .bin file.
You don’t need to rename the file. Just pick
MINI_ACB_V5_12.ino.bin from wherever you saved it — the
upload handler ignores the name you picked and always writes the file to the
SD card as /miniacb_firmware.bin, which is the one name
[update] looks for.
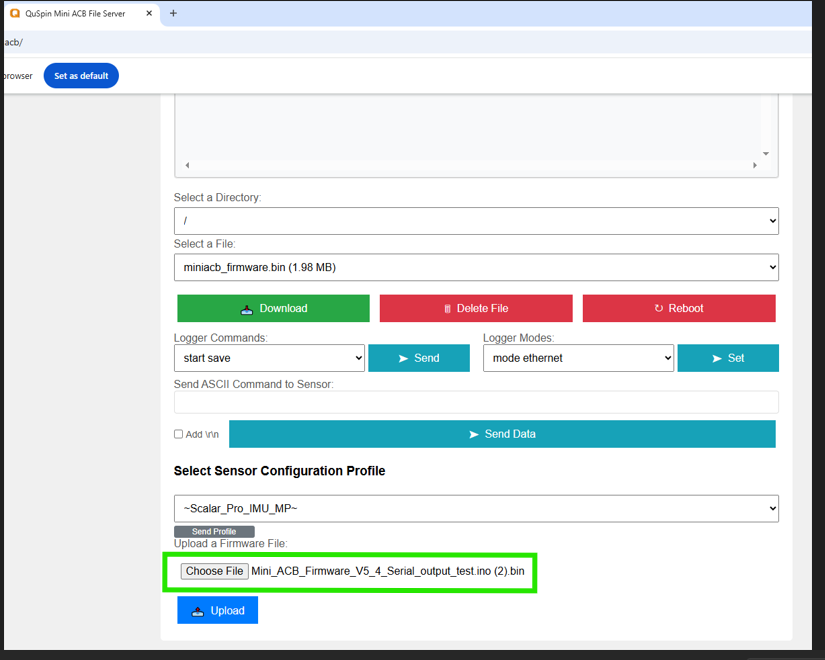
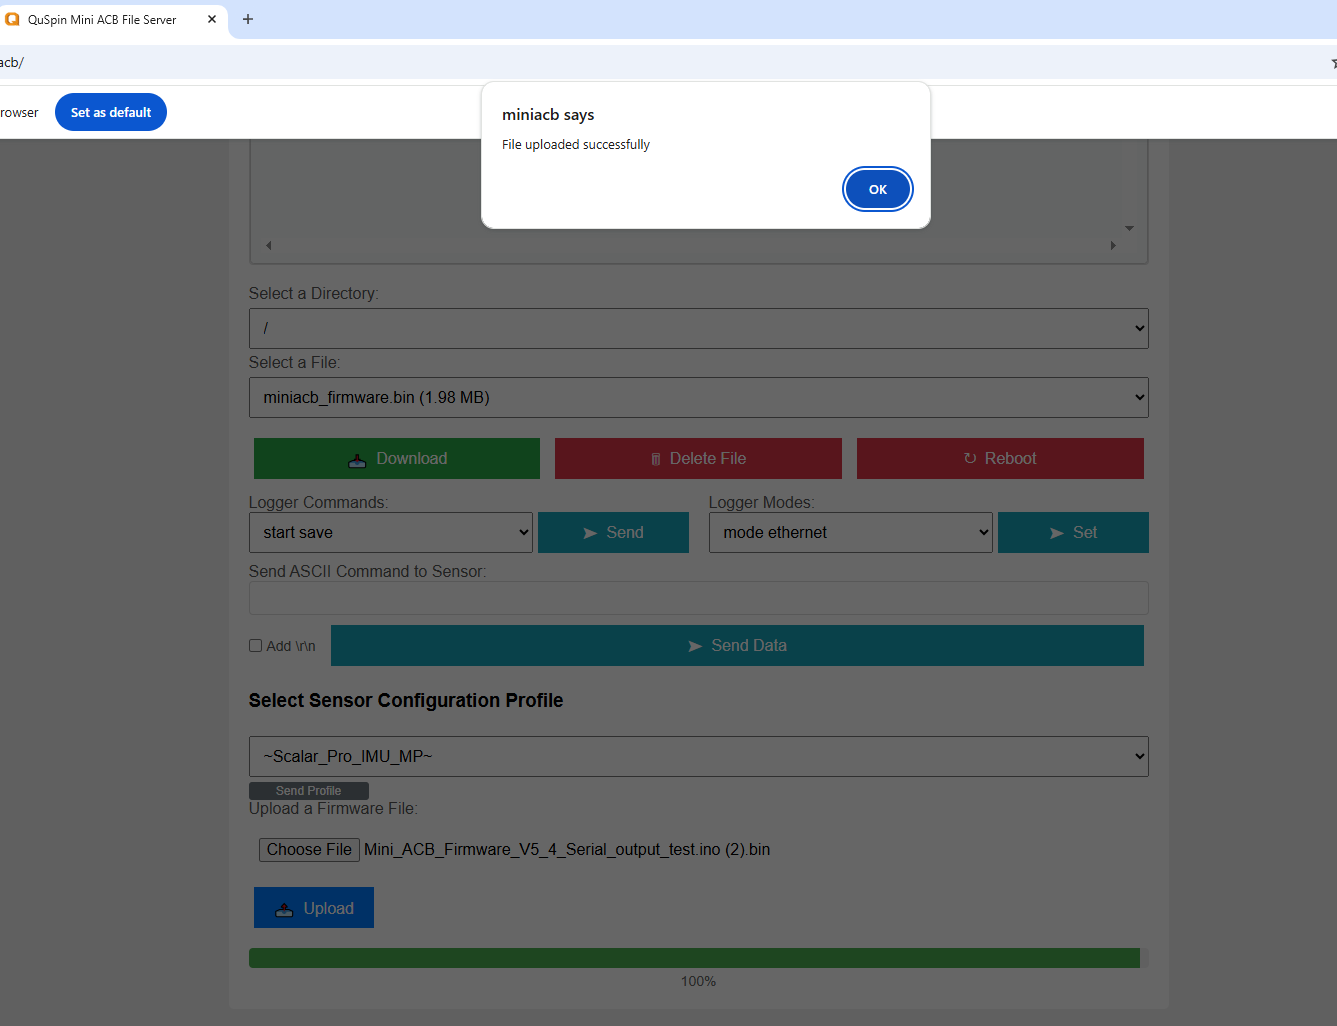
Click “Upload” and wait for the success message.
You should see “File uploaded successfully” once the transfer completes. The file is now staged on the Magpie’s SD card; it has not been applied yet.
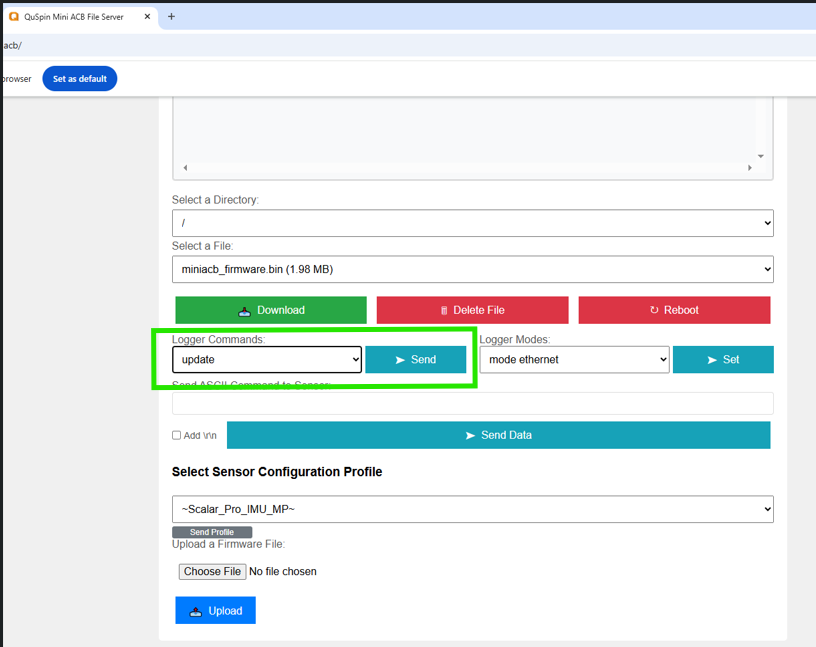
Send the [update] command.
From the Logger Commands dropdown on the same page, select update
and click Send. (Or send [update] via your serial terminal or
Bluetooth app.)
Watch the logger LED.
The logger LED will turn cyan for 20 to 30 seconds while the new firmware is being written.
If you interrupt the write, the firmware can be left in a half-flashed state and you will need Method 2 to recover.
The Magpie reboots automatically once the update is complete.
If the LED instead blinks red three
times and nothing else happens, the update never started: no file
named /miniacb_firmware.bin was found on the SD card, or it was
zero bytes. See Troubleshooting.
Confirm the new firmware is running.
After reboot, send [test] or check the boot banner. You should see
the new version string (for example #FW Version: MINI_ACB_V5.12)
and the (flash-safe) marker described above.
Method 2: ESP32_Flasher.exe (UART)
This method uses a small Windows utility to flash the all-in-one merged binary directly to the ESP32 over USB. It’s the most reliable update path and is required whenever the partition table changes between releases. Use it for first-time setup, recovery from a failed OTA, or whenever the release notes call for a UART flash.
Before you start
- Windows PC (the flasher is Windows-only)
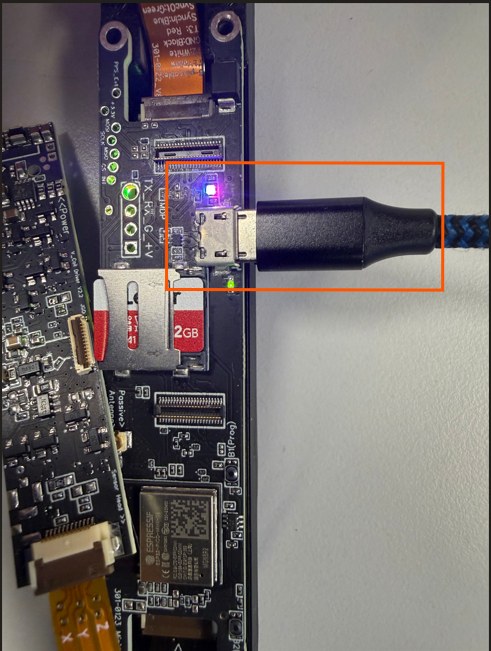
- USB cable from the PC to the Magpie’s micro-USB port
- Downloaded
MINI_ACB_V5_12.ino.merged.bin - Downloaded
ESP32_Flasher.exe
Disconnect the Ethernet breakout board (if you have one) during the flash. It can interfere with the USB serial path. You can reconnect it after the flash completes.
Steps
Connect the Magpie to your PC via USB.
Use the micro-USB connector on the Magpie sled (highlighted below). Windows
should detect a new COM port; note its number from Device Manager (it appears as
something like Silicon Labs CP210x USB to UART Bridge (COM7)).
Launch ESP32_Flasher.exe.
Double-click the downloaded executable. Windows may show a SmartScreen warning the first time you run it. Click “More info” then “Run anyway” to proceed.
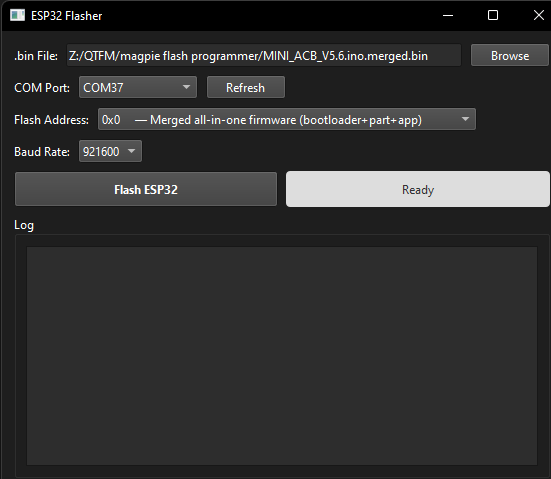
Configure the flasher window.
- .bin File: click Browse, select
MINI_ACB_V5_12.ino.merged.bin - COM Port: select the COM number from step 1 (click Refresh if it doesn’t appear)
- Flash Address: set to
0x0 — Merged all-in-one firmware (bootloader+part+app) - Baud Rate: leave at
921600(default)
Click “Flash ESP32” and wait.
The log window will show the connection handshake, erase, and write progress bars. A successful flash ends with:
Wrote 4194304 bytes (1367651 compressed) at 0x00000000 in 28.2 seconds (1189.9 kbit/s).
Verifying written data...
Hash of data verified.
Hard resetting via RTS pin...
--- Finished ---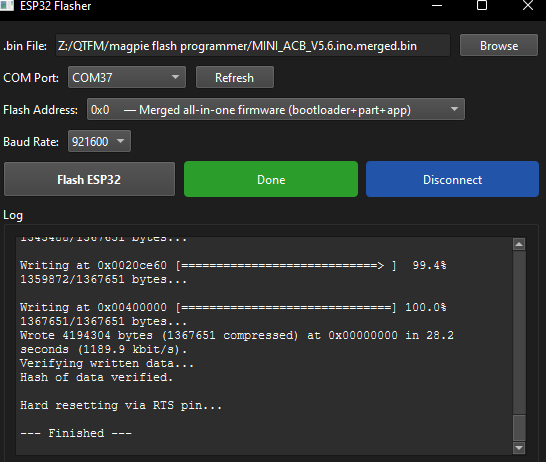
Disconnect.
Once you see “Finished”, click Disconnect (or just close the flasher) and unplug the USB cable. The Magpie will reboot into the newly-flashed firmware.
Confirm the new firmware is running and restore the serial number.
Open PuTTY (or any serial terminal) on the same COM port at 921600 baud, or connect via Bluetooth or Wi‑Fi. The boot banner should show the new version string.
The merged.bin image includes a fresh partition table and overwrites the NVS partition where the saved serial number, Ethernet IP, channel names, and other preferences live. After flashing, those are reset to defaults.
Send [refresh_sn] over PuTTY (or Bluetooth/Wi‑Fi). The
Magpie queries the connected sensor for its serial number and writes it back to
the logger config. You will see something like:
#Serial Number: T2M0-00NB
Re-apply any other settings you had customized (Ethernet IP, channel names,
mode, ASPN on/off, etc.) using the standard [eth ip ...],
[channel ...], [mode ethernet], etc. commands.
Alternative: app-only UART flash (preserves preferences)
If your Magpie is running fine and you just want to update the firmware while
keeping all your saved preferences (serial number, Ethernet IP, channel names, mode,
etc.) intact, you can flash the smaller .bin file at the App partition
address instead of the merged image. This path leaves the NVS partition untouched,
so no [refresh_sn] step is needed afterward.
Use this when you want a “drop-in” upgrade. Do NOT use this path to recover a bricked unit — the App-only image doesn’t include the bootloader or partition table, so a corrupted bootloader will still leave the unit unable to start. For recovery, always use the merged.bin path above.
The procedure is identical to Method 2 above, with two differences:
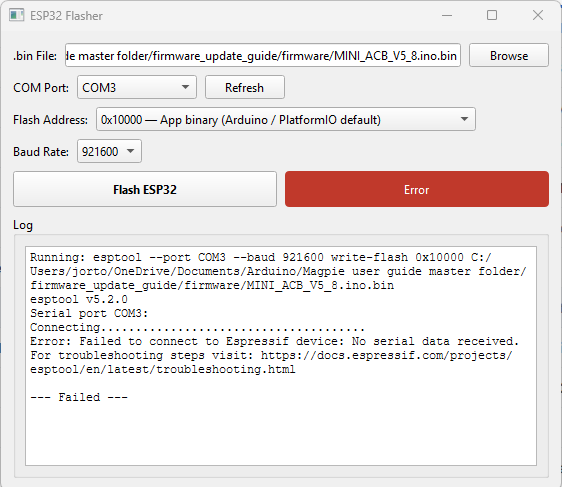
- .bin File: select
MINI_ACB_V5_12.ino.bin(the smaller ~2 MB file used for Wi‑Fi OTA), not the merged.bin - Flash Address: set to
0x10000 — App binary (Arduino / PlatformIO default)
After clicking Flash ESP32 the rest of the procedure is the same as steps 4 to 6
above. Once the Magpie reboots, your saved preferences should still be intact. Verify
with [show config] or by checking the boot banner.
Troubleshooting
| Symptom | Likely cause and fix |
|---|---|
| OTA upload fails or hangs | Wi-Fi signal too weak or unstable. Move closer to the Magpie. If repeated attempts fail, fall back to Method 2. |
| Magpie reboots but boot banner shows the old version | The [update] command was never sent after upload. The file is on the SD card but hasn’t been applied. Send [update] and watch for the cyan LED. |
| Logger LED blinks red 3× after [update] and the unit never reboots | The firmware isn’t on the SD card under the name [update] looks for. It must be /miniacb_firmware.bin in the card’s root. Uploading through the Magpie web page renames it for you; copying the file onto the card with a card reader does not, so a file still called MINI_ACB_V5_12.ino.bin is invisible to [update]. Rename it and resend [update]. The same 3× red blink also means the file is present but zero bytes — a truncated copy — so re-copy if the name was already right. |
| Logger LED never turns cyan after [update] | The .bin file may not have uploaded successfully. Re-upload and retry. If it still fails, switch to Method 2. |
| Magpie won’t boot after a partial OTA (red LED, no banner) | The OTA was interrupted mid-write. Use Method 2 (ESP32_Flasher.exe) to flash the merged.bin, which restores the full image. |
| ESP32_Flasher.exe shows “Failed to connect” | Wrong COM port, or another program (PuTTY, Arduino IDE, etc.) is holding the port. Close other serial tools and verify the COM number in Device Manager. |
| Flash succeeds but the unit doesn’t enumerate after | USB cable may be charge-only. Use a known-good data cable. If that doesn’t help, hold the Magpie’s button while reconnecting USB to force the bootloader. |
| Wrong file uploaded (e.g. merged.bin via OTA) | The smaller .bin is for OTA only. The merged.bin is for the flasher only. Re-upload the correct file for your method. |
| Bluetooth COM port stops working after updating to V5.12 | Expected one-time effect: V5.12 changes the Magpie’s Bluetooth address (see What’s new). Remove the old pairing in your Bluetooth settings, pair the unit again, and use the new Outgoing COM port. If the new port shows no COM number, reboot the PC once. |
Email QuSpin support at info@quspin.com with your Magpie serial number, the firmware version you’re trying to load, and a description of what you’re seeing (LED states, error messages). We’ll get you back up and running.
Last updated: 2026-07-07 · Firmware version: MINI_ACB_V5.12